A great deal of the success in a well-managed grazing system is owed to the design of the fencing infrastructure. Especially in managed grazing systems where livestock are rotated frequently, a well-designed fencing system that accommodates rotational grazing can make or break the system.
Infrastructure design in grazing systems is as much art as it is science because it must be tailored to the landscape and goals of each farm. So, how do you begin the “artistic” process? It often takes several years of experience for a farmer or grazing planner to develop an eye for designing effective fencing systems.

While first-hand experience cannot be replaced, there are a few general principles of fencing system design that can be considered as a good starting point. Our fact sheet, 15 Tips for Designing Fencing Systems for Managed Grazing, lays out those principles. Read more and download the fact sheet below.
Effective Managed Grazing Fence Systems
In an effective managed-grazing fencing system, much of the interior fencing will be portable, temporary fencing. Permanent fencing must be able to accommodate temporary fencing for the fencing system to remain adaptable as weather, herd size, and nutritional needs change through the grazing season.
Creating Management Units
Tip 1: Utilize permanent fencing to divide the land into management units based on soil type. Different soil types will be suited to different forage species and productivity levels which will be grazed differently.
Tip 2: Treat sensitive areas such as stream corridors, concentrated flow paths, or wooded areas as separate management units, fencing them so they can be managed uniquely. Cropland that is grazed should be fenced as a separate management unit.
We refer to large blocks of permanently fenced
pasture as management units.
Sizing Management Units
Tip 3: Accommodate haymaking by creating management units large enough for harvesting equipment or other mechanical management, when possible.
Tip 4: Set up management units rectangular with an approximate width of 150-350’ so individual paddocks will be as close to square as possible.
Gates
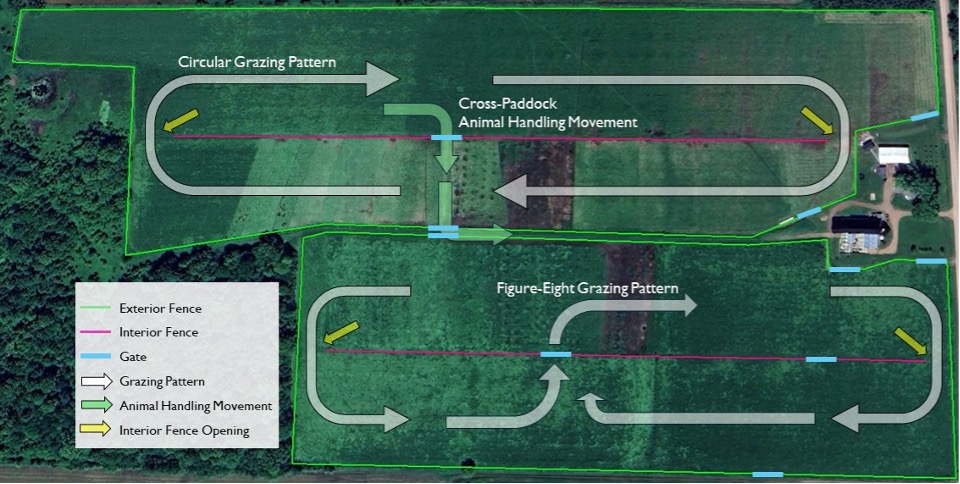
Tip 5: Consider the flow of animals/equipment through the pasture system to determine where gates are needed.
Tip 6: Place gates in corners of management units to allow easy flow of the herd from one unit to the next.
Tip 7: Place gates in the middle of long spans of interior fence to allow direct movement of animals across pastures.
Tip 8: Design gate openings large enough to accommodate harvesting (e.g., 4 rounds with 15’ haybine = 60’).
Fence Placement
Tip 9: Consider how weeds and brush will be managed along fencelines, and how fence placement can accommodate.
Tip 10: Consider how to get animals to working/loading facilities from any point of the pasture.
Watering System
Tip 11: Run water lines under permanent fence lines wherever possible.
Tip 12: Run water lines between management units so a single waterline can be used for two or more units.
Tip 13: Plan for ample hookups to allow for water in each subdivision or paddock within a management unit.
Tip 14: Avoid placing watering sites near gates.
Tip 15: Avoid placing watering sites in concentrated flow paths or critical and sensitive areas.
What’s the difference between a gate and an opening?
A gate is a permanent structure in a fence that can be opened and closed. The fence on either side of the gate should remain electrified whether it is opened or closed, and the gate should not be used to transfer electrical current from one side to the other.
An opening is a break in an interior fence that does not consist of a permanent structure for closure. When individual paddocks are adjacent to an opening, it can be closed off with temporary fencing materials such as a geared reel with polywire and step-in posts.
For both gates and openings, electrical current should be transferred from one side to the other with a buried underground cable.

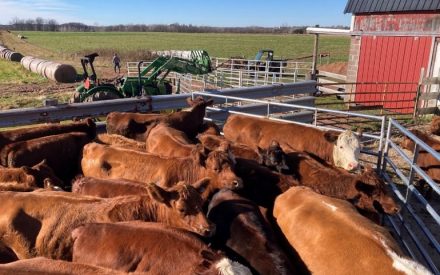 15 Tips for Effective Cattle Handling in Grazing Systems
 Managing Rust in Cool Season Pastures
 Grazing Cover Crops and Annual Forages
 Grazing to Protect Surface Water: Considering critical and sensitive areas