
Home » Nutrient application guidelines for field, vegetable, and fruit crops in Wisconsin (A2809) » Sampling Soils for Testing
Sampling Soils for Testing
Sampling Soils for Testing
A soil test is the only practical way of determining whether lime and fertilizer are needed for a specific crop. However, if a soil sample does not represent the general soil conditions of the field, the recommendations based on the sample may be misleading. An acre of soil to a 6-inch depth weighs about 1,000 tons, yet less than 1 ounce of soil is used for each test in the laboratory. Therefore, it is very important that the soil sample be representative of the entire field.
Before collecting soil samples, you should determine the overall approach of the nutrient management program. This will affect the number of samples needed and method by which samples will be taken. Specifically, will nutrient and lime applications be made at a single uniform rate for the whole field being tested or will applications be made at variable rates to field areas that have been identified as having different soil test levels?
What are the goals of a soil sampling program?
When sampling soils for testing and obtaining fertilizer and lime recommendations, the most common objectives are to:
- Obtain samples that accurately represent the field from which they were taken.
- Estimate the amount of nutrients that should be applied to provide the greatest economic return to the grower.
- Estimate the variation that exists within the field and how the nutrients are distributed spatially.
- Monitor the changes in nutrient status of the field over time.
How do I select a soil sampling strategy?
Before selecting a sampling strategy, consider:
- analytical costs,
- time and equipment available,
- field fertilization history,
- the likelihood of a response to applied nutrients.
Sampling fields for a single whole field (uniform) recommendation
With conventional sampling, you will receive a single set of nutrient and lime application guidelines that are based on sample averages. The sampling guidelines in Table 2.1 are based on when a field was last tested (more or less than 4 years ago) and whether the field was responsive or nonresponsive the last time it was tested. The field is considered to be in the responsive range if either soil test phosphorus (P) or potassium (K) levels are in the high (H) category or lower. A nonresponsive field is one where both soil test P and K levels are in the very high (VH) or excessively high (EH) categories.
Table 2.1 – Recommended sample intensity for uniform fields
Fields Testing In Responsive Range OR Fields Sampled More Than 4 Years Ago
| Field Size (acres) | Suggested Sampling Rate1 |
|---|---|
| All Fields | 1 sample per 5 acres |
Example: 48-acre field testing in responsive range
48 acres * (1 sample / 5 acres)
= 9.6 samples
Round to 10 samples
10 samples (10 cores per sample) required
Non-Responsive Fields Tested Within The Past 4 Years
| Field Size (acres) | Suggested Number of Samples1 |
|---|---|
| 5-10 | 2 |
| 11-25 | 3 |
| 26-40 | 4 |
| 41-60 | 5 |
| 61-80 | 6 |
| 81-100 | 7 |
Each sample should be made up of a minimum of 10 cores to ensure accurate representation of the nutrient needs of the field. Research has shown that taking 10 to 20 cores provides a more representative sample of the area than when samples are made up of fewer cores. When gathering soil cores to make a composite sample, use a W-shaped sampling pattern (as shown in Figure 2.1) over the whole area the sample represents. Be sure to thoroughly mix the cores before placing approximately 2 cups in the sample bag.
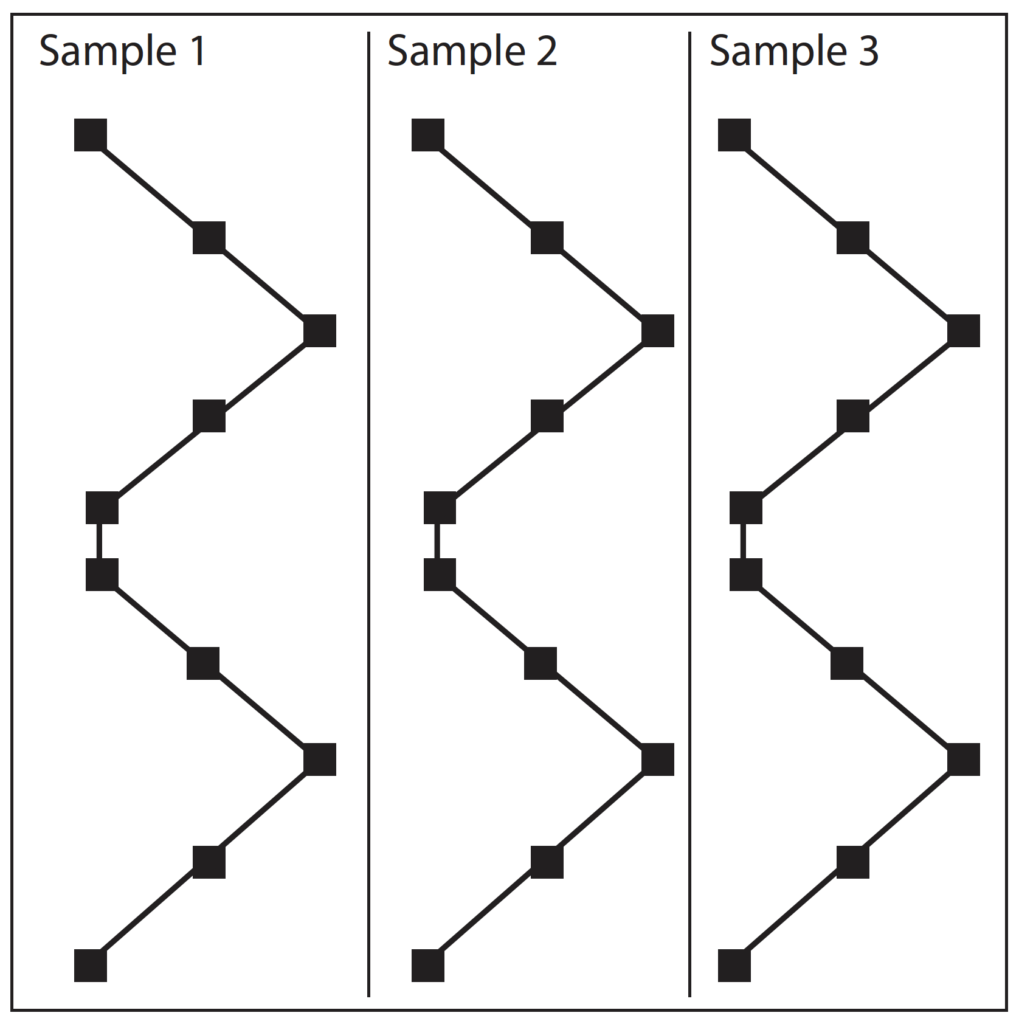
Figure 2.1. Recommended W-shaped sampling pattern for a 15-acre field. Each sample should be composed of at least 10 cores.
For best results, submit multiple samples for all fields. When at least three samples are provided for a field, samples that are significantly higher than the field average may be discarded and an adjusted average calculated. Using an adjusted average helps ensure that no part of the field is under-fertilized.
Where only one or two samples are taken in a field, no sample will be discarded, whereas one sample can be discarded if three or four samples are taken, and up to two samples may be discarded from fields having five or more samples. The criteria that determine if soil samples should be omitted from the field average include:
- If the average soil test P for a field is 35 parts per million (ppm) or less, samples that exceed the field average by more than 5 ppm may be removed and the field average recalculated.
- If the field average is greater than 35 ppm P, no samples will be discarded.
- If the average soil test K for a field is 175 ppm or less, samples that exceed the field average by more than 20 ppm may be discarded and the field average recalculated.
- If the field average is greater than 175 ppm K, no samples will be discarded.
It is not appropriate to vary nutrient application rates across sampling areas when using the whole field (uniform) soil sampling scheme.
Sampling fields for site-specific management
Site-specific management requires a distinct picture of the magnitude and location of soil test variability. Sampling soils for site-specific management usually involves taking many more composite samples than sampling for a single recommendation. A global positioning system (GPS) is used to record the geographical coordinates of each sample. This information is used to generate an application map by using various mathematical techniques to interpolate the nutrient application rate between sampling points. Using variable rate application technology, these fields can be managed more intensively than the conventional approach of one fertilizer and lime rate per field. A careful evaluation of the economics of this intensive of a sampling system needs to be done before proceeding.
When using a site-specific approach to soil sampling, sample handling and testing are similar to the traditional system, but recommendations may vary from one part of the field to another, and these areas must be managed separately to realize the potential advantages of intensive soil sampling.
Several sampling strategies can be used to guide variable-rate fertilizer and lime applications. Grid sampling uses a systematic approach that divides the field into squares of approximately equal size (grid cells).
The sampling technique used is known as grid-point sampling. A grid-point sample consists of at least 10 cores collected from a small area (10-foot radius) around a geo-referenced point. When using a grid sampling approach, Wisconsin research recommends a sampling strategy based on an unaligned systematic grid (Figure 2.2). Sampling points should be unaligned because sampling in a uniform grid arrangement may lead to biased results if aligned with row patterns.
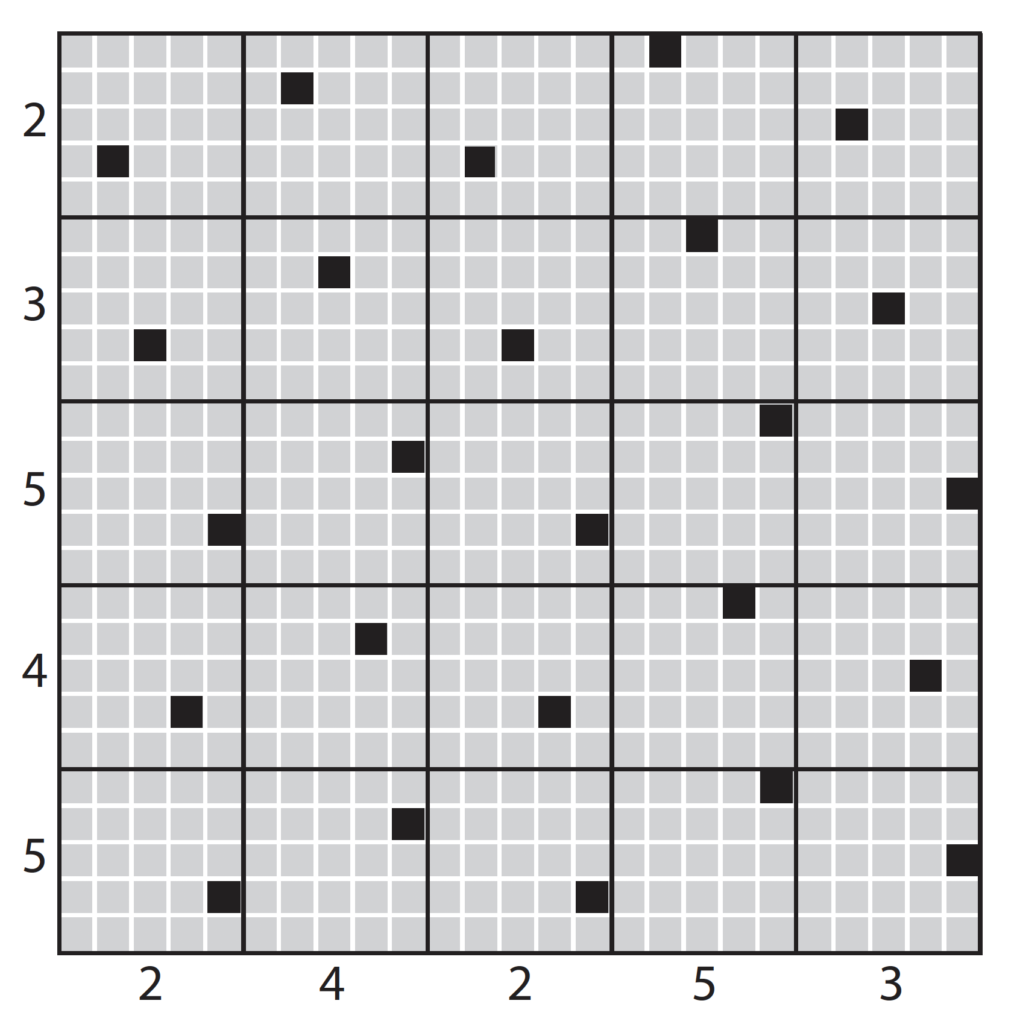
Figure 2.2. An example of an unaligned grid pattern for grid sampling fields.
Fields that have soil test P and K levels in the nonresponsive categories should be grid-point sampled on a 300-foot grid. This is equivalent to one soil sample for every 2 to 2.5 acres. Where there is no information about the P or K status of the field or where previous tests were in the responsive range, a 200-ft grid size should be used. This is equivalent to approximately one soil sample per acre. Wisconsin research indicates these small grid cell sizes are needed to adequately characterize the variability in soil fertility. A larger grid cell size (such as 5 acres) may not adequately describe the field variability and may limit the potential economic benefits of site-specific management.
What are other considerations in selecting a sampling strategy?
The sampling strategy selected must also be appropriate for the field size and topography.
Contour strips
On contour strip fields, sample each strip separately if it is approximately 5 acres or more in size, following the sampling intensity guidelines provided in Table 2.1. Cores from two or three small strips that have identical cropping and management histories may be combined following these same recommended sampling intensity guidelines. Using a grid-point sampling approach on contour strips or small fields is not appropriate, regardless of grid cell size. This is because a grid technique may result in many soil samples being collected from one contour strip but none in other strips; additionally, grid-point samples may be on the edge of the strips and not adequately represent the strip.
Five-acre grid-point sampling
The 5-acre grid point sampling system for whole field management recommendations has recently become popular with soil samplers because it takes less time to collect cores, compared to the traditional W pattern. Another advantage of this approach is its ability to track changes in soil test levels over time, because soil samples are collected from the same geo-referenced point each time the field is sampled. Five-acre grid-point sampling can likely be used in some situations and not in others. For example, in fields that were soil sampled within the past 4 years and tested in the nonresponsive range, averaging the soil test results from 5-acre grid-point sampling is reasonable. This is because there previously had not been a fertilizer recommendation on these fields and some variability at excessively high soil test levels does not change the fact that no fertilizer was recommended. For fields that were sampled more than 4 years ago or where past soil test results were in the responsive range, 5-acre grid-point sampling may not be the best choice of sampling techniques. This is because 5-acre grid-point sampling may not adequately represent the variability within a field, and a comparatively small change in soil test level of 5 to 10 ppm could mean a large change in the amount of nutrients recommended. For small fields and contour strips, taking a few 5-acre grid-point samples in each field and averaging them likely does not provide a very representative sample of the field. Additionally, the total number of samples may be so few that none of them can be eliminated from the field average if it appears that one is an outlier.
Smart (zone or directed) sampling
Another approach gaining support among researchers is smart sampling, also known as directed or management zone sampling. This approach uses information that has been collected using other precision agricultural technologies such as yield maps, aerial photographs of bare soil or crop canopy, or soil electrical conductivity measurements. Directed sampling evaluates the spatial distribution of several factors that may influence nutrient availability and crop productivity to help define sampling areas with similar characteristics. With previous comments in mind, either the W pattern or grid-point method can be used to collect samples within management zones. If the results of grid or management zone sampling do not warrant variable-rate application (for example, relatively little between-sample variation), average them to determine the appropriate single-rate treatment.
How do I take soil samples?
When to take soil samples
Take soil samples at any convenient time. Studies examining the effect of sampling time on soil test results suggest that test values for pH and phosphorus (P) are typically slightly higher in early spring samples than in fall samples. The effect of time of sampling on soil test potassium (K) results is dependent upon clay mineralogy and soil test level. Soil test K results may be higher in spring compared to fall on lower testing soils, but on higher testing soils, soil test K may be lower in spring compared to fall. To receive your recommendations early enough to enable you to apply the lime and fertilizer needed, it may be best to sample in the fall. Another benefit of fall testing is that fertilizer prices are more likely to be discounted then. Hayfields can be sampled after any cutting. Regardless of when you sample, it is best to be consistent from one year to the next.
Winter sampling, or sampling when the soil is frozen, is permissible only when it is possible to take a uniform boring or core of soil to the appropriate depth. This may require using a portable power boring tool. Using a pick or spade to remove a few chunks of frozen soil from the surface will give inaccurate results.
How to take soil samples
Certain government agency programs require nutrient management plans prepared according to the current USDA-NRCS nutrient management standard (590). Soil sampling and testing procedures and nutrient application rates based on these soil tests must be consistent with the provisions of the 590 standard to be eligible for many cost-sharing programs.
These provisions currently include:
- following the soil sampling techniques outlined above and contained in the University of Wisconsin- Extension publication Sampling Soils for Testing (A2100),
- soil testing by a Wisconsin certified laboratory,
- use of nutrient application rates consistent with the guidelines contained in this publication.
When ready to sample, use a sampling probe or auger. You can obtain these tools on loan from most county Extension offices or fertilizer dealers. Avoid sampling the following areas:
- Dead furrows or back furrows
- Lime, sludge, or manure piles
- Animal droppings
- Near fences or roads
- Rows where fertilizer has been banded
- Eroded knolls
- Low spots
- Where stalks or large bales were stacked
- Headlands
In addition, avoid sampling areas that vary widely from the rest of the field in color, fertility, slope, texture (sandy, clayey, etc.), drainage, or productivity. If the distinctive area is large enough to receive lime or fertilizer treatments different from the rest of the field, sample it separately.
The following steps will help you take full advantage of the Wisconsin nutrient application guidelines and must be followed to be consistent with the 590 standard.
- If manure or crop residues are on the surface, push them aside to keep from including them in the soil sample.
- Insert the probe or auger into the soil to plow depth or at least 6 inches. The sampling depth should be consistent. To aid year-to-year comparisons, it is important to take repeated samplings from the same field to exactly the same depth.
- Take at least 10 soil cores or borings for each composite sample and, preferably, at least two composite samples for every field. For nonresponsive fields greater than 5 acres in size, obtain, at a minimum, the number of samples specified in Table 2.1. For responsive fields, as well as all fields that have not been sampled in the past 4 years, take one composite sample for every 5 acres.
- Thoroughly mix the sample, then place about 2 cups of soil in a sample bag.
- Identify the bag with your name, field identification, and sample number.
- Record the field and sample location on an aerial photo or sketch of the farm and retain for your reference. Record the GPS coordinates, if available.
- Fill out the soil information sheet. A completely and carefully filled out soil test information sheet will provide the most accurate nutrient recommendations.
Always include a soil test information sheet when submitting soil samples to a laboratory for testing. The soil test information sheet used by the UW Soil Testing Laboratories can be found here.
Provide the soil name and field history whenever possible for more accurate recommendations. Information about legume crops previously grown on the soil and manure application history is essential for proper nutrient crediting from these sources. Include soil names and/or map unit symbols from county soil survey reports, web soil survey, or individual farm conservation plans. For assistance obtaining this information, contact your regional Extension ag educator, NRCS district conservationist, or the County Land Conservation Department (LCD).
How often to sample
Most fields should be retested at least every 4 years to monitor soil fertility levels of immobile nutrients and pH to prevent nutrient deficiencies and avoid excess nutrient accumulation. Crop nutrient removals over a 4-year period in most cropping systems will not change soil test levels enough to affect recommended nutrient application rates. Exceptions include sands and loamy sands, which should be tested every 2 years. Also, depending on the initial soil test P and K levels, cropping systems such as high-yielding corn silage or alfalfa may require more frequent testing to adequately monitor changes in soil test levels.
What to do with soil samples
The soil samples and a completed soil information sheet can be taken to your county Extension office for forwarding to a certified soil testing laboratory. Alternatively, samples can be sent directly to the soil testing laboratory or delivered in person.
To receive nutrient application rate guidelines consistent with those found in this publication, submit your soil samples to one of the Wisconsin certified laboratories. The College of Agricultural and Life Sciences, University of Wisconsin–Madison and the University of Wisconsin-Extension, through the Department of Soil Science, operate soil testing laboratories at Madison. Several private laboratories are also certified, and are listed here. To become certified, laboratories must use the soil testing methods and nutrient application rate guidelines specified by WDATCP. Certified laboratories must also meet quality control standards through periodic analysis of quality control soil samples.
To have your soil tested by the University of Wisconsin, send your samples to laboratory listed below. A sample submission form can be found here. Form instructions and crop codes can be found here.
University of Wisconsin Soil and Plant Analysis Laboratory
4702 University Avenue
Madison, WI 53705
(608) 262-4364
soil-lab@mailplus.wisc.edu
How does my tillage system impact my soil sampling procedure?
Moldboard plowing: Sample to the depth of tillage.
Chisel plowing and offset disking: Take soil samples to ¾ of the tillage depth. When possible, take soil samples before spring or fall tillage. Sampling before tillage lets you determine the sampling depth more accurately and avoid fertilizer bands applied for the previous crop.
Till-plant and ridge tillage: Sample ridges to a 6-inch depth and furrows (between rows) to a depth of 4 inches. Combine equal numbers of soil cores from ridges and furrows to make up the composite sample.
No-till: Fields that have not been tilled for 5 or more years may develop an acid layer on the surface from the use of nitrogen fertilizer. This acid layer could reduce the effectiveness of triazine herbicides. Unincorporated phosphorus (P) and potassium (K) are also likely to build up in the surface soil. If an acid layer is suspected, take a separate sample to a depth of only 2 inches. When sending the soil to the lab, indicate that the sampling depth was only 2 inches. This sample will be tested for pH only, unless P and K are specifically requested. For fertilizer recommendations, take a separate sample to a depth of 6 to 7 inches. Fertilizer recommendations require this sampling depth because fertilizer calibration studies are based on plow-depth sampling. Sample between rows to avoid fertilizer bands.
Chapter Authors and Editors

Natasha Rayne, Ph.D.
Assistant Professor and Extension Specialist – Soil Fertility and Nutrient Management
Manure placement, timing, and nitrogen credits; organic soil amendments and nutrient cycling; climate-smart and site-specific nitrogen management; improvement of nitrogen use efficiency in cereal crop production.

Hava Blair, Ph.D.
Researcher, Soil Scientist
Developing and implementing soil fertility, erosion, and nutrient loss models in SnapPlus
Last Updated: June 18, 2024